Android adapter
简单来说:适配器是用来帮助数据以合适的形式显示在view中给用户看的。
Android中Adapter类其实就是把数据源绑定到指定的View上,然后再返回该View,(eg:而返回来的这个View就是ListView中的某一 行item。)这里返回来的View正是由我们的Adapter中的getView方法返回的。(这样就会容易理解数据是怎样一条一条显示在ListView 中的。)
Adapter是连接后端数据和前端显示的适配器接口,是数据和UI(View)之间一个重要的纽带。在常见的View(ListView,GridView)等地方都需要用到Adapter。如下图直观的表达了Data、Adapter、View三者的关系:

Android中的adapter

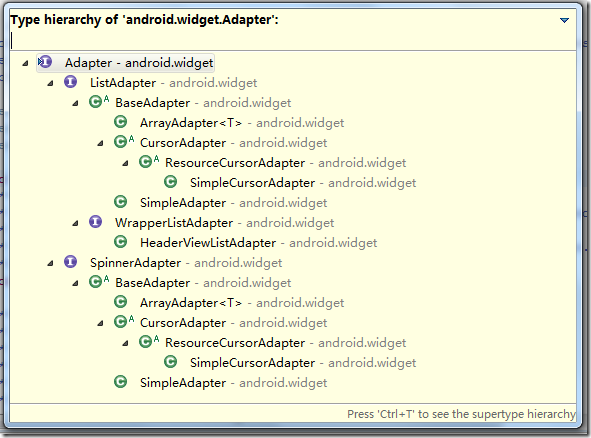
在我们使用过程中可以根据自己的需求实现接口或者继承类进行一定的扩展。比较常用的有 BaseAdapter,SimpleAdapter,ArrayAdapter,SimpleCursorAdapter等。
- BaseAdapter是一个抽象类,继承它需要实现较多的方法,所以也就具有较高的灵活性;
- ArrayAdapter支持泛型操作,最为简单,只能展示一行字。
- SimpleAdapter有最好的扩充性,可以自定义出各种效果。
- SimpleCursorAdapter可以适用于简单的纯文字型ListView,它需要Cursor的字段和UI的id对应起来。如需要实现更复杂的UI也可以重写其他方法。可以认为是SimpleAdapter对数据库的简单结合,可以方便地把数据库的内容以列表的形式展示出来。
ArrayAdapter(数组适配器)
只能显示一行文本数据
https://www.cnblogs.com/huolan/p/5126794.html
布局文件
1
2
3
4
5
6
7
8
9
10
11
12
| <?xml version="1.0" encoding="utf-8"?>
<LinearLayout
xmlns:android="http://schemas.android.com/apk/res/android"
android:layout_width="match_parent"
android:layout_height="match_parent"
android:orientation="vertical">
<ListView
android:id="@+id/ll1"
android:layout_width="match_parent"
android:layout_height="wrap_content">
</ListView>
</LinearLayout>
|
Java文件
1
2
3
4
5
6
7
8
9
10
11
12
13
14
15
16
17
18
19
20
21
22
| package com.example.test3;
import android.app.Activity;
import android.os.Bundle;
import android.widget.ArrayAdapter;
import android.widget.ListView;
public class MainActivity extends Activity{
private String[] datas = {"张三","李四","王五","麻子","小强"};
private ArrayAdapter<String> adapter;
private ListView listView;
@Override
protected void onCreate(Bundle savedInstanceState) {
super.onCreate(savedInstanceState);
setContentView(R.layout.activity_main);
listView = (ListView) findViewById(R.id.ll1);
adapter = new ArrayAdapter<>(this,android.R.layout.simple_expandable_list_item_1,datas);
listView.setAdapter(adapter);
}
}
|
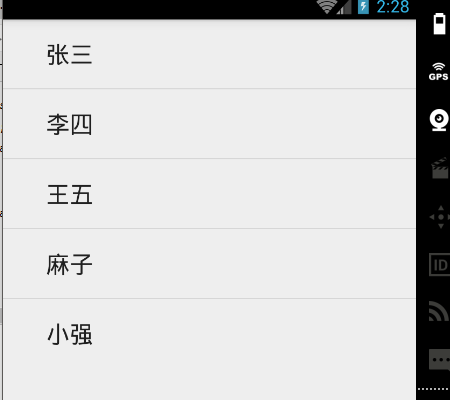
效果图:

ArrayAdapter的参数说明:
第一个参数:context上下文对象
第二个参数:每一个item的样式,可以使用系统提供,也可以自定义就是一个TextView
第三个参数:数据源,要显示的数据
系统提供的item的样式,可以试一试:
simple_list_item1:单独的一行文本框
simple_list_item2:有两个文本框组成
simple_list_item_checked每项都是由一个已选中的列表项
simple_list_item_multiple_choice:都带有一个复选框
simple_list_item_single_choice:都带有一个单选框
SimpleAdapter
simpleAdapter的扩展性最好,可以定义各种各样的布局出来,可以放上ImageView(图片),还可以放上Button(按钮),CheckBox(复选框)等等。
使用的样例:
1
2
3
4
5
6
7
8
9
10
11
12
| <?xml version="1.0" encoding="utf-8"?>
<LinearLayout
xmlns:android="http://schemas.android.com/apk/res/android"
android:layout_width="match_parent"
android:layout_height="match_parent"
android:orientation="vertical">
<ListView
android:id="@+id/ll1"
android:layout_width="match_parent"
android:layout_height="wrap_content">
</ListView>
</LinearLayout>
|
实现的item样例:
1
2
3
4
5
6
7
8
9
10
11
12
13
14
15
16
17
18
19
20
21
22
23
24
25
26
27
28
29
30
31
32
33
34
| <?xml version="1.0" encoding="utf-8"?>
<LinearLayout xmlns:android="http://schemas.android.com/apk/res/android"
android:layout_width="wrap_content"
android:layout_height="wrap_content"
android:orientation="horizontal">
<ImageView
android:id="@+id/image1"
android:layout_width="100dp"
android:layout_height="100dp"
android:src="@mipmap/ic_launcher"
android:layout_margin="5dp"/>
<LinearLayout
android:id="@+id/ll2"
android:layout_width="match_parent"
android:layout_height="100dp"
android:orientation="vertical"
android:layout_marginTop="5dp"
android:layout_marginLeft="10dp">
<TextView
android:id="@+id/text1"
android:layout_width="wrap_content"
android:layout_height="wrap_content"
android:text="哈哈"
android:textSize="30sp"
android:layout_marginTop="10dp"/>
<TextView
android:id="@+id/text2"
android:layout_width="wrap_content"
android:layout_height="wrap_content"
android:text="哈哈哈哈哈"
android:textSize="24dp"
android:layout_marginTop="10dp"/>
</LinearLayout>
</LinearLayout>
|
java文件
1
2
3
4
5
6
7
8
9
10
11
12
13
14
15
16
17
18
19
20
21
22
23
24
25
26
27
28
29
30
31
32
33
34
35
36
37
38
39
40
41
42
43
44
45
46
47
48
| package com.example.test3;
import android.app.Activity;
import android.os.Bundle;
import android.widget.ListView;
import android.widget.SimpleAdapter;
import java.util.ArrayList;
import java.util.HashMap;
import java.util.List;
import java.util.Map;
public class MainActivity extends Activity{
private List<Map<String,Object>> lists;
private SimpleAdapter adapter;
private ListView listView;
private String[] theme = {"张三","李四","王五"};
private String[] content ={"我是张三,你好","我是李四,你好","我是王五,你好"};
private int[] imageViews = {R.mipmap.ic_launcher,R.mipmap.ic_account,R.mipmap.ic_password};
@Override
protected void onCreate(Bundle savedInstanceState) {
super.onCreate(savedInstanceState);
setContentView(R.layout.activity_main);
listView = (ListView) findViewById(R.id.ll1);
lists = new ArrayList<>();
for(int i = 0;i < theme.length;i++){
Map<String,Object> map =new HashMap<>();
map.put("image",imageViews[i]);
map.put("theme",theme[i]);
map.put("content",content[i]);
lists.add(map);
}
adapter = new SimpleAdapter(MainActivity.this,lists,R.layout.list_item
,new String[]{"image","theme","content"}
,new int[]{R.id.image1,R.id.text1,R.id.text2});
listView.setAdapter(adapter);
}
}
|
效果图:

simpleAdapter中五个参数的
第一个参数:上下文对象
第二个参数:数据源是含有Map的一个集合(使用simpleAdapter的数据用一般都是HashMap构成的List,list的每一节对应ListView的每一行。)
第三个参数:每一个item的布局文件
第四个参数:new String[]{}数组,数组的里面的每一项要与第二个参数中的存入map集合的的key值一样,一一对应
第五个参数:new int[]{}数组,数组里面的第三个参数中的item里面的控件id。
BaseAdapter
使用ViewHolder来优化。减少findViewById的使用
就是一个持有者的类,他里面一般没有方法,只有属性,作用就是一个临时的储存器,把你getView方法中每次返回的View存起来,可以下次再用。这样做的好处就是不必每次都到布局文件中去拿到你的View,提高了效率。
https://www.jianshu.com/p/46d7ef09cb88
baseAdapter的逗比式、普通式、文艺式链接:
https://www.jianshu.com/p/112ccd04c5ff
逗比式:没有使用到ListView的缓存机制,每需要显示一个item布局,就会创建一个新的View对象
普通式:利用了ListView的缓存特性,如果没有缓存(convertView)才创建新的View
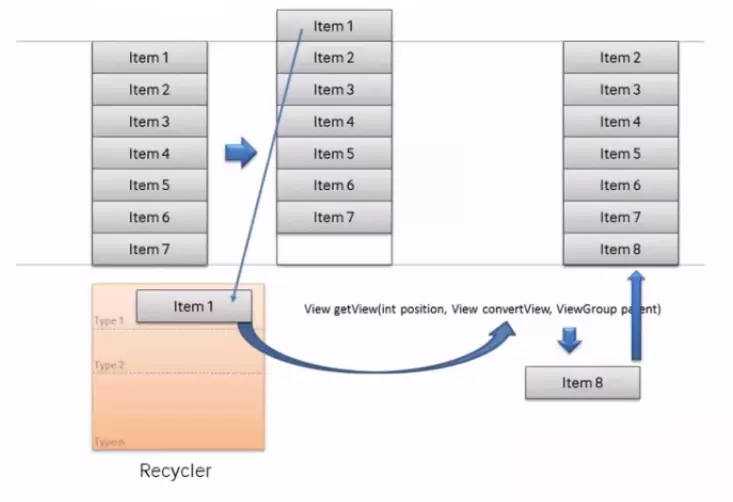
ListView的显示和缓存机制:

文艺式:使用到了ViewHolder。使用convertView中的setTag方法(他是给View对象的一个标签,标签可以是任何内容)屏幕中有多少view就会创建多少与之对应的viewholder类。循环的时候,就不用findviewby了,因为之前已经findviewby过了 并且存储在viewholder类中。
详细介绍的viewholder和缓存机制是怎么协同的:https://blog.csdn.net/MoDuRooKie/article/details/80198431
Tag不像ID是用标示view的。Tag从本质上来讲是就是相关联的view的额外的信息。它们经常用来存储一些view的数据,这样做非常方便而不用存入另外的单独结构。
setTag方法:https://blog.csdn.net/grandgrandpa/article/details/82964251


